Search by category:

You may have noticed that the time on your iPhone is off by a few hours. This can be annoying, especially if you rely on your iPhone to keep track of time.

Androidtermurah.com is the ultimate destination for tech-savvy consumers. From the latest tools and equipment to the best deals on technology, they have something to meet your every need. Whether you’re a tech enthusiast or just looking for a good deal, they got you covered.

Here’s how to change the time zone on your iPhone:

1. Open the Settings app.

2. Tap “General.”

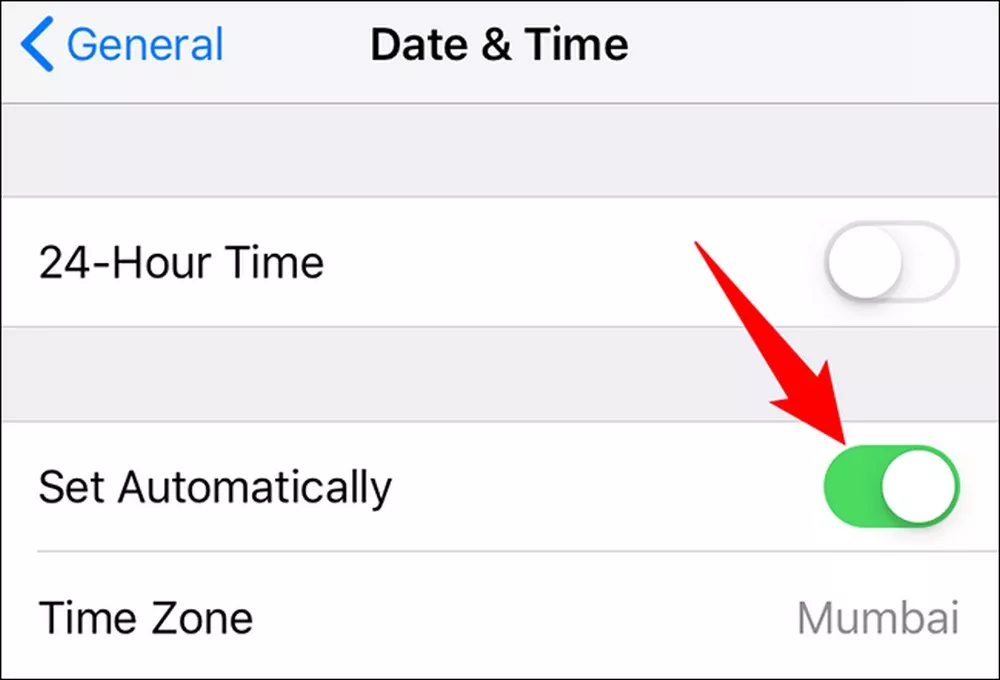
3. Tap “Date & Time.”

4. Tap the switch next to “Set Automatically.”

5. Tap the time zone that you want to use.

6. Tap “Done.”

Your iPhone will now use the new time zone.

If you’re traveling and want to update the time zone on your iPhone, you can do so in just a few taps. Here’s how.

Open Settings and tap “General.”

Tap “Date & Time.”

Turn off the “Set Automatically” toggle.

Tap the “Time Zone” field and enter the city you’re in. If you’re not sure of the city, tap “Search” and enter a keyword.

When you’re finished, tap “Done.”

Your iPhone will now display the correct time and date for your current location.

If you’re traveling internationally or have moved to a new time zone, you can change the time zone on your iPhone so that the time and date remain accurate. Here’s how to do it:

1. Open the Settings app on your iPhone.

2. Tap on General.

3. Tap on Date & Time.

4. Tap on the time zone that you want to use.

5. Tap on the button to the right of Set Automatically to turn it off.

Now, the time and date on your iPhone will be set to the time zone that you selected. Keep in mind that if you haveSet Automatically turned on, your iPhone will automatically adjust the time zone for you based on your current location.

By now, you’ve probably gotten the hang of using your new Dell Intel Tablet. But just in case you’re still getting used to things, we’ve put together a list of 10 tips and tricks to help you get the most out of your device.

Check out Androidtermurah before making your next gadget or appliances purchase! Androidtermurah.com a website providing guide, articles, tips and expert deal hunter who picks the highest quality tech products at the best prices available.

Get to know the touchscreen

The touchscreen is the most important part of your Dell Intel Tablet – after all, it’s how you’ll be interacting with all your apps and content. So it’s worth taking some time to get to know how it works. Experiment with different ways of tapping, swiping and pinch-to-zoom. And don’t forget about all the other ways you can interact with the touchscreen, like using the on-screen keyboard or writing with a stylus.

Use the keyboard shortcuts

There are plenty of keyboard shortcuts that can make using your Dell Intel Tablet even easier. For example, you can quickly open the settings menu by pressing the Windows key + I. Or take a screenshot by pressing the Windows key + Print Screen. To see a full list of keyboard shortcuts, just open the settings menu and go to “Keyboard shortcuts”.

Connect a Bluetooth keyboard and mouse

If you want to use your Dell Intel Tablet like a mini laptop, then you’ll need to connect a Bluetooth keyboard and mouse. This will make it much easier to type and navigate around your device. To connect a Bluetooth keyboard or mouse, just open the settings menu and go to “Bluetooth”.

Install the Dell Tablet Dock

The Dell Tablet Dock is a great way to turn your Dell Intel Tablet into a mini desktop computer. Just dock your tablet in the dock and you’ll have access to a full-sized keyboard, mouse and monitor. You can even connect other peripherals, like a printer or scanner.

Get familiar with the apps

There are a ton of apps available for your Dell Intel Tablet, so it’s worth taking some time to explore what’s out there. Start by opening the “Store” app and browse through the featured apps. You can also search for specific apps using the search box. And don’t forget to check out the “Top Free” and “Top Paid” lists to see what’s popular.

Customize the home screen

You can customize the home screen on your Dell Intel Tablet to suit your needs. Just open the settings menu and go to “Home screen”. Here you can add and remove apps, change the wallpaper and more.

Use your tablet as a second screen

If you have a laptop or desktop computer, you can use your Dell Intel Tablet as a second screen. This is great for working on two things at the same time or for giving presentations. To set this up, just open the settings menu and go to “Display”.

Take advantage of the sensors

Your Dell Intel Tablet has a number of built-in sensors that can be used by apps and games. For example, the accelerometer can be used to detect when you tilt your tablet. And the gyroscope can be used for gaming or augmented reality. To see a full list of sensors, just open the settings menu and go to “Sensors”.

Use your tablet as a phone

Did you know that you can use your Dell Intel Tablet as a phone? Just install a VoIP app like Skype and you’ll be able to make calls over the internet. You can even use your tablet to send and receive text messages.

Connect to a projector or TV

If you want to share your tablet’s screen with a group of people, you can connect it to a projector or TV. This is great for giving presentations or watching movies. To do this, just open the settings menu and go to “Display”.

If you’re a music lover, you know that listening to your favorite tunes can be a great way to relax and unwind. But if you’re stuck using headphones that don’t quite fit right or that don’t have the best sound quality, it can be hard to enjoy your music to the fullest. That’s why we’ve put together this list of tips to help you get the most out of your Sony Bluetooth headphones.

Are you looking for a way to save money on your next purchase? If so, then you may want to consider using coupon codes. Meganeerabi is a platform that offers a variety of different coupon codes and deals that can be used to save money on your next purchase.

Make sure your headphones are charged

Before you start using your headphones, make sure that they’re fully charged. This will help ensure that you get the best sound quality possible.

Take the time to adjust the fit

It’s important to make sure that your headphones are snug but not too tight. If they’re too loose, they may fall off, and if they’re too tight, they may be uncomfortable to wear for long periods of time.

Use the EQ settings to customize the sound

Most Sony Bluetooth headphones come with EQ settings that allow you to customize the sound to your liking. Experiment with the different settings to find the perfect sound for you.

Listen at a moderate volume

If you listen to your music too loudly, it can damage your hearing over time. Try to keep the volume at a moderate level so that you can still enjoy your music without putting your hearing at risk.

Clean your headphones regularly

Your headphones can get dirty over time, so it’s important to clean them on a regular basis. Use a soft, dry cloth to wipe down the headphones and remove any dirt or debris.

By following these tips, you’ll be able to get the most out of your Sony Bluetooth headphones and enjoy your music to the fullest.

When it comes to office style, the term “business casual” is often used to describe a certain type of clothing that is more relaxed than traditional business attire. But what does business casual really mean? And how can you dress for it in a way that looks professional and polished?

Here’s a quick guide to understanding business casual dress code and how to put together the perfect outfit for any office setting.

What is business casual?

Business casual is a dress code that is typically used in office settings that are less formal than traditional business settings. This type of clothing is usually more relaxed, but it should still be professional and appropriate for the workplace.

Some common items that you might wear as part of a business casual outfit include dress slacks, dress shirts, blouses, polo shirts, and skirts. You can also wear dress shoes, loafers, or other types of closed-toe shoes.

How to dress for business casual

When dressing for business casual, it’s important to remember that you should still look professional and put-together. That means avoiding anything that is too casual, such as jeans, t-shirts, or sneakers.

Instead, focus on choosing clothing that is comfortable but still looks nice. For example, you might wear dress slacks with a dress shirt and a blazer. Or, you could wear a skirt with a blouse and a cardigan.

When it comes to shoes, stick with closed-toe shoes that are comfortable to walk in. Heels are fine, but make sure they’re not too high. And avoid any shoes that are too casual, such as flip-flops or sandals.

Accessories

When it comes to accessories, less is usually more. A simple watch or bracelet is fine, but avoid anything that is too flashy or attention-seeking. And when it comes to handbags, choose a classic style that is large enough to fit your essentials but not so large that it looks bulky.

The bottom line

When it comes to business casual, the key is to remember that you should still look professional and put-together. Choose clothing that is comfortable but still looks nice, and accessorize with simple, classic pieces.

Trail cameras are a great way to keep an eye on your property, whether you’re checking for deer activity or monitoring a potential security issue. But with so many different models and features on the market, it can be tough to know which one is right for you. That’s why we’ve put together this handy guide on how to get the most out of your trail camera 2 pack.

Check out Androidtermurah before making your next gadget or appliances purchase! Androidtermurah.com a website providing guide, articles, tips and expert deal hunter who picks the highest quality tech products at the best prices available.

Here are a few things to keep in mind when using your trail cameras:

Make sure the batteries are fresh

This may seem like a no-brainer, but it’s important to make sure your trail cameras have fresh batteries before heading out into the field. Nothing is more frustrating than coming back to check your cameras and finding that they didn’t capture a thing because the batteries were dead.

Set up your camera in the right spot

To get the most out of your trail camera, it’s important to place it in an area where wildlife is most likely to cross. This could be a game trail, a water source, or a heavily trafficked area on your property.

Use the right settings

Most trail cameras come with a variety of settings that allow you to customize your images. For example, you can set the camera to take photos only at night, or you can adjust the sensitivity to ensure that you’re not getting a bunch of false triggers.

Check your camera regularly

Depending on the area you’re monitoring, you may need to check your trail camera more or less frequently. If you’re only checking for deer activity, once a week should suffice. But if you’re using your camera for security purposes, you’ll want to check it more often to make sure nothing suspicious is going on.

Protect your camera from the elements

If you’re using your trail camera in an area that gets a lot of rain or snow, it’s important to protect your camera from the elements. Some models come with built-in weather-resistant housing, but you can also purchase aftermarket covers to keep your camera dry.

By following these simple tips, you’ll be sure to get the most out of your trail camera 2 pack.

iPad Pro is a powerful device, and Apple’s Smart Keyboard Folio makes it even more versatile. But there are a few iPad Pro keyboard shortcuts that are essential for anyone who uses this tablet as their primary computer. If you’re looking for guide about reviews, how to and deals on Apple products that’s sure to please everyone on your list, please consider to read on Iphonebrand.

Here are 10 Apple keyboard shortcuts for iPad Pro that will change the way you work:

Force Touch trackpad: This shortcut is essential for anyone who uses the iPad Pro as their primary computer. Force Touch the trackpad to enable a secondary click, which is extremely useful for accessing contextual menus and quickly selecting text.

Keyboard brightness: You can quickly adjust your keyboard’s backlight brightness by holding down the Fn key and pressing the F1 or F2 keys.

Home screen: Pressing the Fn + Space bar keys will take you to the home screen, no matter what app you’re currently in.

Lock screen: To quickly lock your iPad Pro, just press the Fn + L keys.

App switching: To quickly switch between apps, press and hold the Fn key, then press the Tab key to cycle through your open apps.

Search: To search for something on your iPad Pro, press the Fn + Option + Space bar keys. This will open the Spotlight search interface.

Take a screenshot: To take a screenshot, just press the Fn + Shift + Option + 3 keys.

Copy and paste: To quickly copy and paste text, press and hold the Fn key, then press the C key and drag your finger to select the text you want to copy. To paste, press the Fn key and then press the V key.

Undo and redo: To undo your last action, press the Fn + Shift + Z keys. To redo an action, press the Fn + Z keys.

Accessibility features: To quickly access the accessibility features on your iPad Pro, press the Fn + Option + F5 keys. This will open the Accessibility pane in the Settings app.

These are just a few of the essential keyboard shortcuts that every iPad Pro user should know. For a complete list of keyboard shortcuts, check out Apple’s support page.

When it comes to choosing the best settings for your Dji Pocket 2 camera, there are a few things to consider. First, what is the purpose of the footage? Are you shooting for a personal project, or for a client? If you’re shooting for a personal project, you can be a little more creative with your settings. But if you’re shooting for a client, it’s important to make sure the footage is high quality and meets their expectations.

Second, what is the environment like? Is it a bright sunny day, or a dark cloudy day? If you’re shooting in a bright environment, you’ll want to adjust your settings to compensate for the extra light. But if you’re in a dark environment, you’ll want to adjust your settings to make sure the footage is still visible.

Third, what is your subject matter? If you’re shooting a landscape, you’ll want to choose different settings than if you’re shooting a close up of a person. Each subject matter requires different settings to get the best results.

Here are a few general tips to help you choose the best settings for your Dji Pocket 2 camera:

-Shoot in 4K whenever possible. This will give you the highest quality footage.

-If you’re shooting in a dark environment, make sure to increase the ISO. This will help the camera sensor capture more light.

-If you’re shooting in a bright environment, make sure to decrease the ISO. This will help prevent the footage from being overexposed.

-If you’re shooting a close up, make sure to use a shallow depth of field. This will help the subject stand out from the background.

-If you’re shooting a landscape, make sure to use a deep depth of field. This will help keep the entire scene in focus.

-Experiment with different shutter speeds to get different effects. A slower shutter speed will create a blurry effect, while a faster shutter speed will freeze the action.

-Don’t be afraid to try different settings. The best way to learn what works best is to experiment.

following these tips, you should be able to get the best results from your Dji Pocket 2 camera.

Discord is a voice and text chat app designed for gamers that lets you easily find, join, and chat with friends. It’s free, secure, and works on both your desktop and phone. Here are some tips to help you get the most out of Discord.

Use the search function

Discord’s search function is a great way to find old messages, channels, and users. To search for something, simply type in the box at the top of the Discord interface.

Connect your accounts

Discord can be used to connect with friends on other platforms, including Steam, Twitch, and Twitter. To do this, simply go to the “Connections” tab in your user settings and follow the instructions.

Use Discord Webhooks

Discord Webhooks are a great way to get notified about events in your Discord server. To set one up, simply go to the “Webhooks” tab in your server settings and follow the instructions.

Use Discord Bots

Discord bots are a great way to add extra features to your Discord server. There are bots for everything, from games to music to utility. To add a bot to your server, simply go to the “Bots” tab in your server settings and follow the instructions.

Use Discord Rich Presence

Discord Rich Presence is a great way to show off what you’re doing in Discord. To set it up, simply go to the “Rich Presence” tab in your user settings and follow the instructions.

Use Discord Server Folders

Discord Server Folders is a great way to organize your Discord servers. To set up a folder, simply go to the “Server Folders” tab in your server settings and follow the instructions.

Use Discord Voice Channels

Discord Voice Channels are a great way to stay in touch with friends and family. To set up a voice channel, simply go to the “Voice Channels” tab in your server settings and follow the instructions.

Use Discord Themes

Discord Themes are a great way to customize the look and feel of Discord. To install a theme, simply go to the “Themes” tab in your user settings and follow the instructions.

Use Discord Extensions

Discord Extensions are a great way to add extra features to Discord. To install an extension, simply go to the “Extensions” tab in your user settings and follow the instructions.

Use Discord Nitro

Discord Nitro is a great way to support the development of Discord and get access to some cool features. To sign up for Discord Nitro, simply go to the “Nitro” tab in your user settings and follow the instructions.

Discord is a great platform for gamers and non-gamers alike. By following the tips above, you can get the most out of Discord and make the most of your experience.

It’s important to be thoughtful about what you share and to check the source of the information.

When it comes to your personal brand, social media can be a great way to connect with customers and create a positive image. But it’s also important to be aware of the potential risks.

Here are some tips for using social media in a way that will protect your personal brand:

– Don’t share anything that you wouldn’t want your boss or customers to see.

– Be careful about what you like or share. If it’s something that could be seen as controversial, think about how it could reflect on you and your business.

– Think before you post. Once something is out there, you can’t take it back.

– If you’re not sure about something, don’t share it.

– Check your privacy settings and make sure only people who you want to see your information can access it.

– Be aware of the tone of your posts. If you wouldn’t say it in person, don’t say it online.

By following these tips, you can protect your personal brand and avoid any negative consequences.

When it comes to social media, it’s important to think about the sources of the information you’re seeing. Just because something is shared on a social media platform doesn’t mean it’s true, or even accurate. In fact, social media can be a breeding ground for fake news and other misinformation.

It’s important to be thoughtful about the sources you trust on social media. If you see something that doesn’t seem right, take a moment to check other sources before you share it. And if you’re not sure whether something is true or not, it’s always best to err on the side of caution.

Remember, just because something is shared on social media doesn’t mean it’s true. Be thoughtful about the sources you trust, and you can help make social media a more accurate and informative platform for everyone.

If you’re looking for a great streaming experience on your Jvc 55 Inch Roku Tv, then you’ve come to the right place. In this guide, we’ll show you everything you need to know to get started.

First, let’s take a look at what you’ll need:

– A Jvc 55 Inch Roku Tv

– A compatible streaming device

– A high-speed internet connection

Now that you have everything you need, let’s get started.

First, you’ll need to connect your Jvc 55 Inch Roku Tv to your streaming device.

Once your Jvc 55 Inch Roku Tv is connected, you’ll need to launch the Roku channel on your streaming device.

Once the Roku channel is launched, you’ll need to sign in with your Roku account.

After you’ve signed in, you’ll see a list of available channels.

Select the channel you want to watch and press the “OK” button on your remote.

You’ll now be able to watch your selected channel.

And that’s all there is to it. Now you can enjoy all your favorite streaming content on your Jvc 55 Inch Roku Tv.

If you’re looking for an affordable, yet high-quality television, the Jvc 55 Inch Roku Tv is a great option. This guide will show you how to set up your new TV so you can start enjoying your favorite shows, movies, and games.

Start by unboxing your Jvc 55 Inch Roku Tv. Be careful not to damage the screen during this process.

Once you have the TV out of the box, find a suitable location for it. Make sure there is enough space around the TV so you can easily access the ports and inputs.

Now it’s time to connect the TV to your power source. Plug the power cord into an outlet and then into the back of the TV.

Once the TV is plugged in, press the power button on the back of the TV. The power light should turn on, indicating that the TV is receiving power.

The next step is to connect the TV to your home’s Wi-Fi network. This will allow you to stream content from your favorite streaming services.

To connect to your Wi-Fi network, go to the settings menu and select the “Network” option.

Select your Wi-Fi network from the list of available networks and enter the password.

Once you’re connected to your Wi-Fi network, you’re ready to start streaming your favorite content.

To access your streaming content, go to the home menu and select the “Apps” option.

Select your streaming service from the list of apps and sign in with your account credentials.

That’s it! You’re now ready to start enjoying your Jvc 55 Inch Roku Tv.