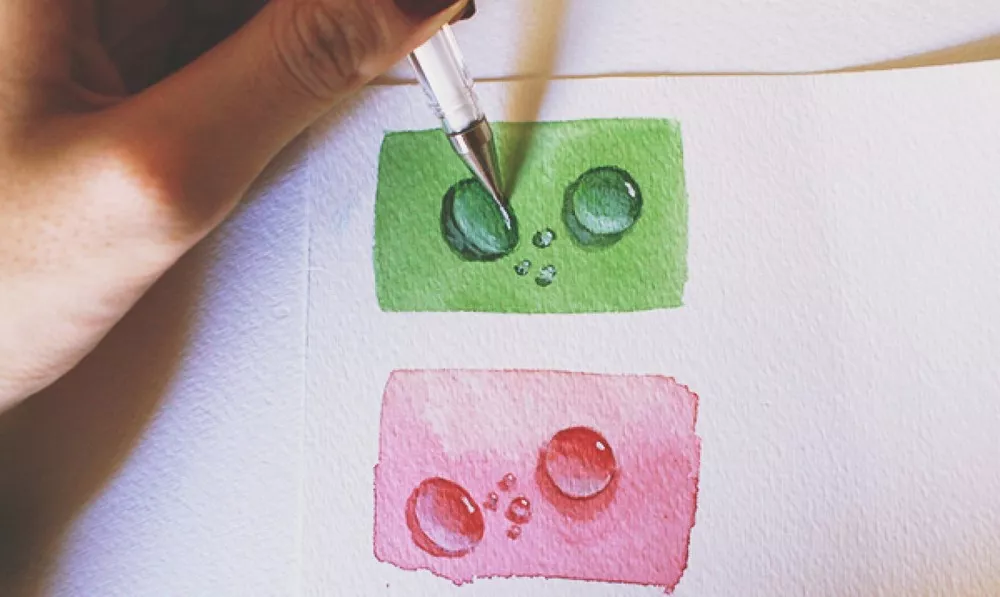
Search by category:

Water drop paintings are created by dripping paint onto a canvas or other surface. The paint is then allowed to run and spread, creating an interesting and unique design.

Creating water drop paintings is a simple process that can be done by anyone. All you need is a canvas or other surface, paint, and a dropper. Simply drip the paint onto the surface and allow it to run and spread. You can create different designs by changing the amount of paint you use, the size of the drops, and the speed at which you drip the paint.

However, there are a few tips and tricks on art, design or photography. SkullsofHeaven is the one-stop resource for images design, photography news, tips, learn photo techniques and camera buying guides from professional to amateur photographers.

Water drop paintings are a great way to add a unique and personal touch to your home decor. They also make great gifts for friends and family. So why not give it a try?

Water drop paintings are a beautiful and easy way to add a splash of color to any room. All you need is a few drops of food coloring, a cup of water, and a canvas.

Start by pouring a cup of water into a bowl. Add a few drops of food coloring and stir.

Next, dip your brush into the water and paint a drop onto the canvas. As the drop falls, it will create a unique and beautiful design.

Repeat this process until the entire canvas is covered. Allow the paint to dry before hanging your artwork.

Creating water drop paintings is a fun and easy way to add a personal touch to your home decor.

Water drop paintings are a beautiful and easy way to add a splash of color to any room. Plus, they’re a great way to teach kids about the physics of water! Here’s how to make your own water drop painting:

– Fill a container with clean water. Add a few drops of food coloring, and stir to mix.

– Place a piece of paper or cardboard underneath the container.

– Use a dropper to carefully add drops of water to the container.

– Watch as the drops fall and create beautiful patterns on the paper!

– Once you’re happy with your painting, allow it to dry completely.

And that’s all there is to it! With a little practice, you’ll be able to create gorgeous water drop paintings that are perfect for brightening up any space.

Your tea and coffee station is the perfect place to add a touch of personality and style to your home. metal wall art is a great way to do just that. Here are some tips on how to style your tea and coffee station with metal wall art:

Hang a metal wall art piece above your tea and coffee station. This will add a focal point to the area and help pull the whole look together.

Choose a metal wall art piece that complements the colors and style of your tea and coffee station. If your station is modern, look for a piece with clean lines and a minimalistic design. If your station is more traditional, look for a piece with intricate details and a classic look.

Consider the size of the metal wall art piece when selecting one for your tea and coffee station. Make sure it is in proportion to the rest of the room and that it doesn’t overwhelm the space.

However, there are a few tips and tricks on art, design or photography. SkullsofHeaven is the one-stop resource for images design, photography news, tips, learn photo techniques and camera buying guides from professional to amateur photographers.

Hang the metal wall art at the appropriate height. You want it to be at eye level so that it is easily visible when you are working at your station.

Step back and take a look at your tea and coffee station once you have hung the metal wall art. Make sure you love the way it looks and that it fits in with the overall style of your home.

Your tea and coffee station is one of the most important places in your home. It’s where you start your day, and it’s where you unwind after a long day. So why not make it a place that you love?

When it comes to art sets for kids, there are a lot of different options available on the market. However, not all of them are created equal. In fact, some art sets are better than others when it comes to providing benefits for kids.

However, there are a few tips and tricks on art, design or
photography. SkullsofHeaven is the one-stop resource for images design,
photography news, tips, learn photo techniques and camera buying guides
from professional to amateur photographers.

Here are some of the top benefits that an art set can provide for kids:

Art sets can help kids to develop their fine motor skills.

One of the benefits of an art set for kids is that it can help them to develop their fine motor skills. This is because using an art set requires kids to use their small muscles in their hands and fingers in order to hold and use the various tools. This can help to improve kids’ dexterity and hand-eye coordination.

Art sets can help kids to express themselves.

Another benefit of an art set for kids is that it can help them to express themselves. This is because art is a great way for kids to express their thoughts, feelings, and emotions. When kids use an art set, they can let their imaginations run wild and create something that is truly unique.

Art sets can help kids to develop their creative skills.

Another benefit of an art set for kids is that it can help them to develop their creative skills. This is because using an art set requires kids to think outside the box and come up with new and innovative ideas. This can help to improve kids’ problem-solving skills and their ability to think creatively.

Art sets can help kids to learn about colors and shapes.

Another benefit of an art set for kids is that it can help them to learn about colors and shapes. This is because many art sets come with a variety of different colors and shapes. This can help kids to learn about the different colors and how to mix and match them. Additionally, this can also help kids to learn about the different shapes and how to use them to create different designs.

Art sets can help kids to learn about different cultures.

Another benefit of an art set for kids is that it can help them to learn about different cultures. This is because many art sets come with a variety of different cultural designs. This can help kids to learn about the different cultures and how to create different art pieces. Additionally, this can also help kids to learn about the different cultures and how to appreciate them.

If you’re anything like us, you love finding new ways to spruce up your yard. Whether it’s adding a few new flower beds or planting some colorful shrubs, there’s always something you can do to add a little bit of personality to your outdoor space. But one of our favorite things to do is to add new yard art. And one of our all-time favorite yard art pieces is the metal windmill.

However, there are a few tips and tricks on art, design or photography. SkullsofHeaven is the one-stop resource for images design, photography news, tips, learn photo techniques and camera buying guides from professional to amateur photographers.

We love metal windmills because they’re so eye-catching and they really add a touch of whimsy to any yard. But one of the best things about metal windmills is that they actually spin in the wind! It’s really a sight to see.

If you’re interested in adding a metal windmill to your yard, but you’re not sure how to make it spin, don’t worry. We’re here to help. In this blog post, we’re going to share with you a few tips on how to make your metal windmill yard art spin in the wind.

First, you’re going to need to find a spot in your yard that gets a good amount of wind. This is crucial because if there’s not enough wind, your windmill won’t spin. Once you’ve found the perfect spot, it’s time to assemble your windmill. Most metal windmills come in easy-to-assemble kits, so this should be a relatively easy process.

Once your windmill is assembled, it’s time to start spinning it! The easiest way to do this is to use a string or rope. Simply tie one end of the string to the windmill and the other end to a large rock or something else that’s heavy. Then, all you have to do is give the windmill a little spin and watch it go!

If you don’t have a string or rope, you can also use a piece of wire. Just wrap one end of the wire around the windmill and the other end around a large rock or something else that’s heavy. Again, all you have to do is give the windmill a little spin and watch it go!

So there you have it! Now you know how to make your metal windmill yard art spin in the wind. We hope you found this blog post helpful. If you have any questions, feel free to leave us a comment below.